How to Teach Melody Writing (Part 2)

This is the second part of a two-part post on Melody Writing Step by Step.
You'll find 'Melody Writing Step by Step Part 1' HERE.
Session 2: The Skeleton Melody.
During Session 1, the class decided on a four-bar/measure chord progression.
Example: C | Am | G | C ||
I vi V I
Session 2 explores how to create a simple melody from that progression.
5. Chord Symbols
During this session/lesson, you will demonstrate how to create a simple melody using ONLY the chord notes for each bar/measure. It is essential to show students this process with student input before attempting this part of the process themselves.
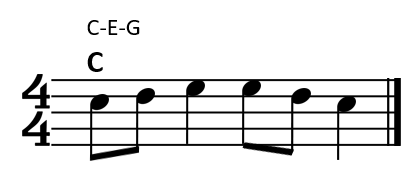
For example, the chord for bar/measure 1 is C. The only notes to be used in this bar are C, E, and G.
Have students write the chord symbols with the three letters of the notes that spell the chord above each measure/bar.
Example:
Bar/measure 2, the Am bar, will use only notes belonging to the A minor chord when writing the skeleton melody.
6. Skeleton Melody
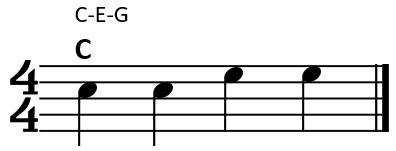
Using only the chord notes, students write their skeleton melody.
At this point, ensure students understand they don't have to use all the notes in order. They don't have to use all three notes. (Because it's bar/measure 1, they will need to begin with the note C)
Keep the rhythm of the skeleton melody very simple; half notes (minims) and quarter notes (crotchets) only.
Example:
As you and your students create the skeleton melody, share the following basic melody-writing tips with them:
- If a note is common to both chords, use it when changing from one chord to the next.
- If the chords do not have a note in common, move to the nearest possible note in the chord you are moving to in the next measure/bar.
- If you have a leap in your melody, it is a good idea to return to a note within the jump.
- Try to keep the melodic line as smooth as possible by avoiding too many big leaps.
Check that students have copied the skeleton melody example into their melody writing workbook.
To end this session/lesson, the students complete an activity to create a skeleton melody based on a four-bar/measure chord progression. They can make the chord progression, or you can give them one to follow.
Students need to play their skeleton melody with the chord progression, or you play it for them to hear how it sounds. Allow them to make changes to the melody if they wish.
The final step in this melody-writing process is to add passing and auxiliary notes between the chord notes.
Session 3: The Skeleton Melody Adding Notes to the Skeleton Melody.
7. Passing and Auxiliary Notes
Explain Passing and Auxiliary notes and demonstrate where they could be added to the skeleton melody created in session 2.
PASSING NOTES are non-chord notes/tones that are used to move from one chord note to another. They are placed on unaccented beats/parts of a beat.
For beginners, stick to adding simple passing notes, i.e. between two chord notes that are a 3rd apart.
Example:
Skeleton melody
Skeleton melody with passing notes added.
AUXILIARY NOTES are used between a repeated chord notes to add interest. It is the note that is one step above or below the chord note.
Example:
Skeleton melody
Skeleton melody with auxiliary notes added.
These SEVEN steps break the melody writing process down into easy-to-digest segments for students and checks understanding along the way.
To help you further, the MTR MELODY WRITING for BEGINNERS gives you the teaching slides and student workbook, all prepared and ready to print off.
Download the PREVIEW of the Melody Writing for Beginners for a FREE, two-page melody writing activity!
See PART 1 of this blog post.
Looking for more time-saving, engaging resources?
Check out MTR’s collection of music teaching materials - SHOP the MTR Store or our store on TpT.
Would you like more music teaching strategies? Check out these related posts to keep your lessons fresh and interactive!
Blog Post: Teaching Rhythm in Music
Blog Post: 5 Call-and-Response ActivitiesTo Keep Your Music Class Engaged
Blog Post: Benefits of Body Percussion Activities
Blog Post: Energize Your Music Classroom With a Fun Rhythm Reading Game
Blog Post: Teaching Music Notation: Fun and Effective Strategies
Blog Post: Giant Staff Jumping Game: Easy Adaptations for Every Grade Level
Blog Post: Benefits of Color-by-Music Activities
Blog Post: 11 Proven Strategies to Keep Students Engaged During Music Rehearsals
Blog Post: Planning a Successful Lesson
MTR 12-Month Memberships
Save time and inspire your students with a growing collection of music-teaching resources!
Subscribe to one of the MTR 12-Month Memberships for Music Teachers today.
Click HERE for more information!
Sign up to receive the monthly MTR newsletter and gain exclusive access to the
FREE Resource Library for music teachers!


